7 Easy Steps to Customizing Your Facebook Timeline Page
Posted by Julie Spira on March 30, 2012 · 4 Comments
![]() Today was the big day that many weren’t waiting for. Facebook officially migrated to the Timeline for pages. If you’re feeling a bit overwhelmed, you’re not alone. Many pages are still left blank without a cover photo. Even if you changed your cover photo, you might notice some unattractive pale blue application boxes on your page. This used to be the “Tabs” section and it’s now called “Apps.” We’ll provide a step-by-step list of how you can customize those thumbnails below.
Today was the big day that many weren’t waiting for. Facebook officially migrated to the Timeline for pages. If you’re feeling a bit overwhelmed, you’re not alone. Many pages are still left blank without a cover photo. Even if you changed your cover photo, you might notice some unattractive pale blue application boxes on your page. This used to be the “Tabs” section and it’s now called “Apps.” We’ll provide a step-by-step list of how you can customize those thumbnails below.
With Facebook’s Timeline change comes a list of rules that you need to adhere to as part of Facebook’s Terms of Service and Guidelines.
Changing your Facebook thumbnail cover is no easy task, so we’ve listed detailed instructions on how to do this on your own.
First of all, review your page apps (formerly tabs) that might have been coded as FBML, Facebook’s version of html code. Your old applications may appear like these below:
To customize them to one of the four allowed boxes, follow these instructions:
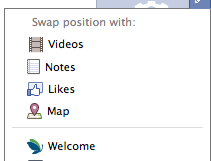
1. Click on the upper right side of the photo box. In the drop down, you can swap positions with the other four you’ve shown and delete apps you aren’t using. Decide whether you want a map to your location, photos, likes, email sign up, or videos.
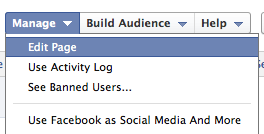
2. Go to your Admin Panel at the top of your page and click on “Manage.”
3. In the drop down, select edit page.
4. On the left side bar, click on “Apps”’
5. Click on “Go to App” and you can change the Title of the Box.
6. Click on Edit Settings and you’ll find “Custom Tab Image.” This is where you upload your thumbnail photo to replace to pale blue default image. You can also change the name here of the title of the app.
7. Click on OK and then you can move around the location of that particular app to appear on your page.
This is a perfect for you to build your mailing list or offer a free eBook on the front of your Facebook page.
Remember, while it might be easy to add a photo to your new cover, there are some things Facebook just doesn’t want you to include including your URL, requests to like your page or follow, or any direct sales action calls. Facebook wants your contact information with links to your business or offers to appear in your “About” section as shown above on our Rules of Netiquette page, where we also added a custom app with a cover providing a free chapter of an upcoming book.
To sum it up remember to optimize your new page by:
- Add a cover photo of 851 x 315 pixels that describes your business and is pleasant to look at.
- Add hyperlinks in the “About” section of your page to draw traffic to your website or specific offer.
- Customize your thumbnails and upload videos directly to your page so your customers can engage with you.
- Include your email subscriber embed code from your email provider and make sure to rename your offer.
- Remember to “Pin to the Top” your important posts, which will remain at the top of your page for seven days or up until you decide to pin something else.
Do you have any Facebook timeline tips that you’d like to share? Please add them in the comments.
Julie Spira is a social media strategist, bestselling author, and CEO of Social Media and More. Visit SocialMediaMore.com for more social media and facebook tips and like us at Facebook.com/socialmediaandmore
PICK MY BRAIN!
CONNECT WITH US!
TESTIMONIALS
On behalf of MAZON and the children of Haiti who we will feed and nourish, I am deeply indebted for the social media marketing that Julie Spira provided for this benefit concert. Without her creating a ‘buzz’ in such a short time, I am certain the event would not have been the success it was. Thank you Julie
Dr. H. Eric Schockman
Former President of MAZON-


